Pink Fire Pointer Batik
Showing posts with label DIY. Show all posts

A Field of Tulips - Hand Art - kindergarten style...

I can't say that it bothers me to get paint on my hands! I love it, and I think the kindergarten kids had a blast too. I am so lucky to be able to come up with art projects for each grade, this one happens to be my son's kindergarten class (80+kids= 80+handprint tulips!).My son's kindergarten teacher, Mrs. S. came up with painting their hands to represent tulips. I think it was a great idea and looks even better in person. 


Starting with the green field field and sky... just wait for the color...


We had a nice assembly line:  Mrs. S. (barefoot) painted the palms of their cute little hands, I held and pressed them on the canvas, the kids painted their own tulip stems and fingerprinted the tulip leaves, then they had help washing their hands...


One class down, 3 more to go! Make a silly face... 


Our tulip field is complete!

Of course... Funny Faces for our tulips... 
(missing 40 + kids-I have yet to post the other 40 of the 80+ kindergarten kids)


Their painting is already hanging in the hall and they will be able to see it next year as they walk to lunch!

*Reduce *Reuse *Recycle - Bottle Cap Art (DIY Wall Art)


Alright, so I know it is past APRIL EARTH MONTH, but I spent all of my time outside the last two weeks of April raking the rocks off of our "rock garden" dirt yard. 

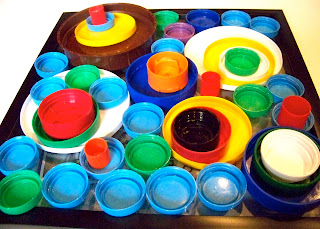
My daughter and I worked on this bottle cap art from our easily collected stash. Super easy- it took us less than an hour to assemble, paint, and glue.

Keep all of your colorful botttle/container caps & lids...


 I bought a cheap shadow box frame and removed the glass. Arrange and create your lid art...


We painted the back of the frame white and my daughter chose bright orange for her background color...

Use a hot glue gun to adhere the caps. 

This looks so amazing in her room- which is an orange and circle theme! Next- My son wants one for his room too.


Reduce. Reuse. Recycle.


..................................................................................................................................................


Make it! by Jane Bull is an wonderful book full of ideas about repurposing household items into creative art.  I based my bottle top art from her original idea. 


*Reduce *Reuse *Recycle - Repurpose Material- Zipper Mouth & Rabbit


The Zipper Mouths

 The Rabbit

I couldn't help but post these 2 projects for EARTH MONTH from repurposed  materials. The special story about them is that the wool material is from my grandmother (86 years old and still quilting!) that she has collected since she was a girl. She has been saving and quilting with her and her sister's skirts, coats, shirts, pants and other random material. For a while she was reluctant to give the "scraps" to me, but after she was sure she was finished with all of her projects (how many years was that again?) she handed the few bags of material to me. What a great example she is.

Just where did it all come from? I love stories behind story...

I created these for my kids & family members- by making up my own patterns (so what I'm saying is, I don't have a pattern to pass on to ya!).

The Zipper Mouths:
wool & polyester material- from my grandmother (86 years old, remember?)
pok a dot material- from my daughter's baby blanket (her grandmother)
silver buttons- from my mother
zippers- from my old pants


The Rabbit:
wool material (body)- again from my grandmother
hand made pink flower- button from an Asian shirt from my other grandmother
button eyes- from my mother's button stash
wood button nose- from my button stash
purple rick rack- from my friend's stash


Share your ideas always!


Reduce. Reuse. Recycle.

*Reduce *Reuse *Recycle - Pencil & Brush holders


EARTH MONTH: Here's another repurposed item that I use to help organize paint brushes (pencils, pens, art supplies) in the art room. It's fun to creatively reuse items without any effort at all! Simple. Share your creative & easy repurposed ideas...

Campbell's Tomato Soup Can= Andy Warhol Pop Art brush organizer


Reduce. Reuse. Recycle.


*Reduce *Reuse *Recycle - NEWSPAPER Abe {tutorial}

 During the month of April, EARTH MONTH (yay), I will "attempt" to post all of my current repurposed and recycled art projects. I'm a big fan of using repurposed items in my art projects and in daily life as well. What a great month of learning and getting into good habits!


Newspaper Abe 


This has been one of my most simple, collaborative, kid art murals made with elementary kids, but for all ages! I love the fact that we used the portrait of Honest Abraham Lincoln (one of my favorite presidents), repurposed newspapers, crayons, a permanent marker, and of course...  
almost 80 1st graders!

And... you can make your own newspaper art in a smaller form with your preferred portrait/s! Be creative.

(We actually completed this near Presidents' Day, but this is my life. Art projects are one story, posting them is another!)

. . . . . . . . . . . . . . . . . . . . . 

Here's my quick tutorial:


(measure, cut, screw, spackle, sand, clean, gesso)


Materials for Wood Canvas:
  • 1" x 2"s
  • masonite board, 1/4" thickness
  • flat head screws, size 6x3/4
  • spackle
  • gesso
(Depending on your desired size will also determine how much of each material you will need.)
*Instead of making your own wood canvas you can use a pre-stretched canvas board, any size.


Materials for Newspaper Abe:
  • transparency sheet (and a projector)
  • newspapers
  • permanent marker
  • crayons
  • Mod Podge
  • plastic wrap

  • Use transparency and overhead projector - free images from openclipart.  


  • Tape newspaper seams together on the back side, trace, and fill in image with permanent marker on the front side.


  • On the back side, graph and number the amount of squares or "shapes" you want. I made a small model on another paper, labeling all of the outside squares just in case I was confused later-it helped! 


  • Cut the newspaper and then color each square with crayons. Be creative! (pattern art, theme art, color schemes, shapes...)
  • Reassemble your shapes back together. 
  • Apply a little more than a thin layer of Mod Podge to your canvas.
  • Carefully lay your colored squares on the Mod Podged area.


  • Lay plastic wrap over the Mod Podge newspaper squares to help smooth out. 
  • Stack books on top so the squares dry flat and do not curl. This helps protect the artwork and books. Dry time as directed on bottle. 
  • Repeat until complete.


Helpful Tips: 

  • Instead of adhering square by square, tape 2 rows together at a time, only using a small amount of tape on the reverse side. Then adhere on the canvas two rows at a time. This helps make sure everything will line up and it's fast! 
  • During each drying wait, wrap & seal your brush up in plastic wrap (so it won't dry out or have to clean it several times).


Make a funny face!

I see mine!

Honest Abe. Good person. Good president.


Reduce. Reuse. Recycle.